
Mastering the Art Library in LightBurn: A Comprehensive Guide
LightBurn software is all about making your creative process smoother and more efficient. One feature that significantly enhances your workflow is the Art Library. This tool allows you to store and apply artwork to any project effortlessly. Instead of repeatedly using File Explorer or importing files, you can drag your frequently used artwork directly from the Art Library into your projects. Let's dive into how you can set up and make the most of this fantastic feature.
Enabling the Art Library
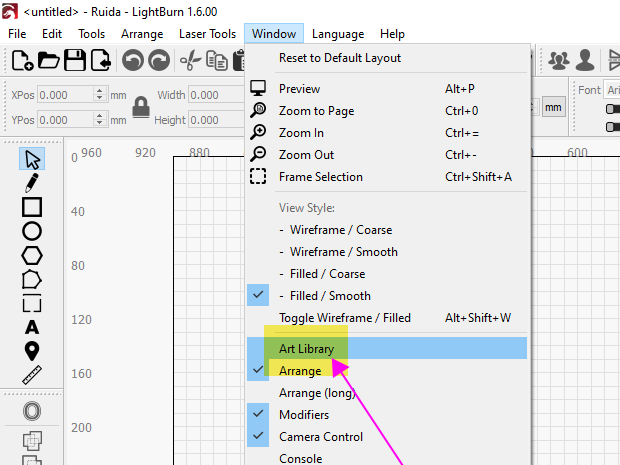
By default, the Art Library isn’t visible in the LightBurn workspace layout. To enable it, navigate to the "Window" drop-down menu in the top toolbar and click on "Art Library." Once activated, the library window will open on the left side of your workspace. Depending on your screen resolution or personal preference, you can click the header to move its location or dock it onto an existing window.
Creating Your First Art Library
If you don't already have an Art Library, you'll need to create one. Click on "New" to open a file explorer window, where you can name your library and choose a location to save the .lbart file. This file will contain all the artwork you add, so it’s crucial to save it in an easily accessible location. I recommend creating a specific folder under "Documents" for your art libraries. Choose a descriptive name for your library to help with organization as your collection grows. For instance, I named my first library "Branding" to store business branding artwork.
Adding Artwork to Your Library
You have two options for adding artwork to your library:
- Importing from Your Computer: Click "Import," navigate to the desired artwork on your computer, and select it. This method is ideal for quickly adding graphics.
- Importing from Your Current Project: Select the artwork in your workspace to make it active, then click "Import Graphic from Project." A text box will pop up, allowing you to name the graphic. Note that the Art Library only saves the graphic itself, not the layer settings. If you want to save the graphic with its layer settings, you’ll need to save the LightBurn project file.
Any artwork you add is automatically saved to the library file and will auto-load when you open LightBurn. Right-clicking on a thumbnail gives you options to rename or delete items.
Using Artwork from Your Library
To add artwork from your library to your current project, you can either drag and drop the thumbnail into your workspace or click a thumbnail and select "Add Graphic to Project." Following the same steps for creating your first library, I created a second library named "Animals" and filled it with relevant graphics.
Managing Multiple Libraries
Clicking on the name of a library allows you to view its contents. If you have libraries that you don’t need all the time, such as holiday-themed libraries, you can unload them to reduce clutter. To unload a library, select it and click "Unload." This action doesn’t delete or modify the library; it simply removes it from view. To make it visible again, click "Load," select the library, and click "Open."
Transferring Libraries Between Computers
Since each library is saved as an individual file, you can easily transfer your art libraries between computers. Just copy the .lbart files to another computer, click "Load" in the Art Library window, and open them to add the libraries to your new setup.
Conclusion
Now that you know how to use LightBurn’s Art Library, you can keep all your graphics neatly organized and just a click away. Also, if you are in need of a laser engraving and cutting machine, contact us and request a free quote. We also service laser machines as well! 🐰