title text over a rabbit rendering on LightBurn and the finished keychain

Design Your First Keychain: Easy Laser Project with LightBurn

Let’s dive into a fun and straightforward project to get you started with your Rabbit Laser USA machine: designing a personalized keychain using LightBurn software. You’ll learn how to engrave text, use the Offset tool to create a border, and cut the keychain from 3mm acrylic. Customize it by choosing any font and text you like!


Step 1: Power Up Your
Rabbit Laser Machine and Open LightBurn


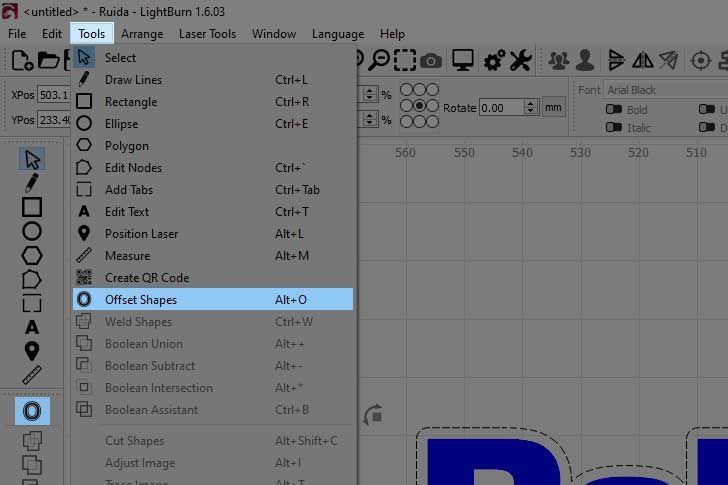
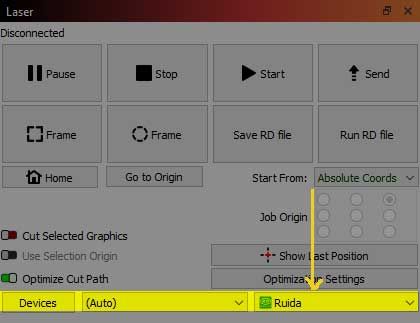
First, make sure your Rabbit Laser machine is powered on and connected to your PC. Open LightBurn software and ensure your laser is selected in the Devices dropdown under the Laser tab.


If your laser isn’t set up in LightBurn yet, go to Devices and select Find My Laser to automatically detect and configure it.

Once your laser is selected, you’re ready to start designing!

Step 2: Prepare Your 3mm Acrylic


Place your 3mm acrylic sheet on the laser bed, making sure it’s securely positioned to avoid movement during engraving and cutting. Adjust the laser focus to match the material for optimal results using the autofocus button.


Step 3: Designing Your Keychain – Adding Text


Now it’s time to add some text for your keychain:

  1. Select the Text Tool from the left toolbar in LightBurn.
  2. Click anywhere on the workspace and type your chosen word. Feel free to pick any word and font that you like.
  3. Use the Selection Tool to resize and position the text in your design. Make sure there’s enough space around the text for the keychain’s outline.


Step 4: Offsetting the Text for the Cut Line


We’ll now create a border around the text using the Offset tool, which will serve as the cut line for the keychain.

  1. With the text selected, go to Tools Offset Shape, or simply click the Offset icon on the toolbar, represented by an "O" with an outline around it.
  2. Set the offset distance to 2mm and click OK. This will create a border around the text, defining the shape of the keychain.
  3. You should now see a new shape around the text, which will serve as your cut line.

Step 5: Setting Up the Engraving Layer for Text


Now we’ll configure the engraving settings for the text:

  1. Select the text and assign it to a new layer in the Cuts/Layers window by changing the color.
  2. Set the layer to Fill mode, so the laser engraves the text area.
  3. Enter the recommended engraving settings for 3mm acrylic:
  • 350mm/s speed
  • 23% power
  • 300 DPI (set this in the Cut Settings Editor under the Fill tab).


Step 6: Setting Up the Cut Layer
for the Keychain Shape


Let’s now set up the cut layer for the keychain’s shape:

  1. Select the Offset Shape and assign it to a different layer (with a new color).
  2. Set this layer to Line mode so the laser will cut along the outline.
  3. For cutting 3mm acrylic, use these settings:
  • 10mm/s speed
  • 30% power


Step 7: Adding a Hole for the Keychain Ring

To make the keychain functional, we’ll add a small hole for attaching the keyring:

  1. Select the Ellipse Tool from the toolbar.
  2. Hold Shift to draw a small circle (about 3mm in diameter) near the top of your design.
  3. To match the text offset, you can offset the circle by 2mm.
  4. After creating the offset circle, select both the offset text shape and the offset circle, and use the Boolean Union tool to merge them into a single shape.
  5. Make sure this merged shape is on the same cut layer as the keychain outline.

Step 8: Final Checks Before Running the Job


Before pressing Start, review the settings:

  1. The text layer should be set to Fill for engraving.
  2. The offset shape (keychain outline) and the hole should be set to Line for cutting.
  3. Engraving settings for 3mm acrylic: 350mm/s speed, 23% power, and 300 DPI.
  4. Cut settings for 3mm acrylic: 15mm/s speed and 30% power.


Pro Tip: Mirror your design in LightBurn so that the engraving is on the backside of the acrylic. This will give your keychain a polished look when viewed from the front.


Click Frame in LightBurn to ensure your design is correctly aligned on the acrylic sheet.


Step 9: Engraving and Cutting


Once everything looks good, press Start in LightBurn. The machine will first engrave the text using Fill mode, then cut the hole and keychain shape. With these settings, your Rabbit Laser machine will produce smooth cuts and clear engraving on 3mm acrylic.


Step 10: Remove and Enjoy!

When the laser finishes, carefully remove the keychain from the bed. If there’s any residue, wipe it down with a cloth or a clean toothbrush. You now have a custom-made keychain, ready for use!

Pro Tips for Rabbit Laser Users


  1. For cleaner cuts on acrylic, raise your acrylic slightly off the bed using small supports or standoffs. This prevents flashback from the laser hitting the honeycomb workbed, ensuring a smoother finish.
  2. Adjust power and speed settings for different materials—your Rabbit Laser machine is versatile and can handle a variety of materials for future projects.


Final Thoughts


Congratulations on completing your first project! You’ve learned how to engrave text, create an offset cut line, and use Boolean Union to merge shapes. These skills will serve you well as you tackle more complex projects. 🐰


For more ideas and inspiration, don’t forget to check us out on social media, and explore Rabbit Laser USA’s accessories and supplies to keep your creativity flowing.


Cut. Create. Conquer.

3D printed attachments and laser-cut components developed by Rabbit Laser USA
By Rod Boehm April 14, 2025
Learn how Rabbit Laser USA combines 3D printing and laser cutting to improve precision, boost efficiency, and innovate custom fabrication solutions.
blog post thumbnail
By Rod Boehm April 2, 2025
Discover the art of crafting beautiful wood inlays with precision laser cutting in our step-by-step guide. Learn essential tips for preparing and testing materials like Baltic birch plywood and cherry wood veneer, ensuring flawless results in your projects. This tutorial covers everything from selecting the right wood and masking techniques to detailed engraving and cutting processes. Perfect for DIY enthusiasts and crafters looking to enhance their skills with laser technology!
By Rod Boehm March 21, 2025
Learn how to master job origins in LightBurn with this essential guide. Discover when to use Absolute Coordinates, User Origin, and Current Position to improve precision, efficiency, and material usage in your laser cutting and engraving projects. Plus, get quick tips to streamline your workflow and avoid common mistakes.
photo of RuiDa control pad and controller
By Rod Boehm March 5, 2025
Discover why RuiDa controllers are the industry standard for laser engraving and laser cutting machines. Learn how they outperform proprietary controllers, offer seamless LightBurn compatibility, and provide unmatched precision. At Rabbit Laser USA, we’ve been upgrading customers' machines with RuiDa to give them full control over their laser cutter and engraver. Upgrade your laser machine today!
laser cut cardinal with blog text
By Rod Boehm February 28, 2025
Create a vibrant, layered cardinal with this beginner-friendly laser cutting guide. Learn color separation, painting tips, and assembly tricks for eye-catching décor.
Rabbit Laser USA's DL-90-1390 co2 laser machine in a classroom setting
By Rod Boehm February 14, 2025
Empower your classroom with Rabbit Laser USA’s reliable laser systems—minimize downtime, save with educator discounts, and spark student creativity!
Blog thumbnail choosing the right lens
By Rod Boehm February 5, 2025
Discover the importance of selecting the right focal length for your CO2 laser machine with Rabbit Laser USA. Learn about different lenses, their optimal uses, and maintenance tips to enhance your laser engraving and cutting projects. Ensure precision and safety with our guide to lens choices and care.
By Rod Boehm January 29, 2025
Learn why maintaining your laser’s exhaust system is crucial for safety, health, and top performance. Get monthly maintenance tips, discover which materials are toxic, and see how Rabbit Laser USA’s 550W Vacuum Blower Fan can keep your workspace safe and efficient.
Learn how to design and create a 57mm cube using MakerCase and Rabbit Laser USA's SD-60-9060 CO2 las
By Rod Boehm January 22, 2025
Learn how to design and create a 57mm cube using MakerCase and Rabbit Laser USA's SD-60-9060 CO2 laser cutter. Follow our step-by-step guide featuring precision settings, cutting tips, and assembly techniques for a perfect fit. Perfect for makers, hobbyists, and educational projects!
title text over a body of water
By Rod Boehm January 15, 2025
Minimize downtime with Rabbit Laser USA's in-stock laser machine parts and fast shipping. From lenses to air assist components, we ensure reliable quality and quick delivery. Count on our lifetime customer support to keep your laser engraving and cutting machines running smoothly. Visit us today to stay productive!
By Rod Boehm January 8, 2025
Learn how to master air assist for laser engraving and cutting projects. Discover when to use air assist, tips for optimizing performance, real-world applications, and troubleshooting common issues. Achieve cleaner cuts, sharper engravings, and safer results with expert guidance from Rabbit Laser USA.
laser tube in front of title text
By Rod Boehm December 31, 2024
Learn how to maximize the lifespan of your CO2 laser tube with expert tips on maintenance, cooling systems, optimal settings, and more. Keep your machine running smoothly and efficiently for years.
More Posts