Precision Cuts: Excel with the Slot and Tab Resizer Tool
Precision matters in laser cutting, especially when your projects involve intricate designs and varying material thicknesses. At Rabbit Laser USA, we embrace tools like LightBurn that help streamline and enhance your cutting experience. Today, we're diving into one such feature—the Slot and Tab Resizer Tool—a godsend for anyone working on 3D puzzles, boxes, or jointed designs. Let's cut through the hassle of manual adjustments and see how this tool can level up your laser cutting game.
Overview of the Slot and Tab Resizer Tool
The Slot and Tab Resizer Tool is designed to simplify your workflow by automatically adjusting slots and tabs to fit the thickness of the material you are using. Whether you're crafting a wooden box or assembling a puzzle, this tool ensures that all pieces fit perfectly, eliminating guesswork and tedious manual edits.
Getting Started with the Tool
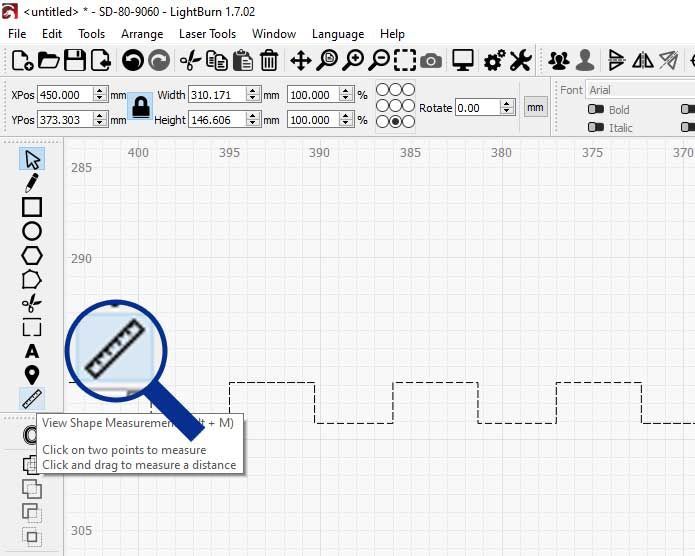
To begin, import your design into LightBurn. Knowing the exact size of the lines you need to adjust is crucial. You can easily find these measurements by selecting the ruler icon from the left toolbar, activating the measurement tool, and hovering over the tabs and slots in your design.
Adjusting Your Design
Once you have your measurements:
- Select the shapes you wish to adjust. If they are grouped, ungroup them using the ungroup icon in the top toolbar.
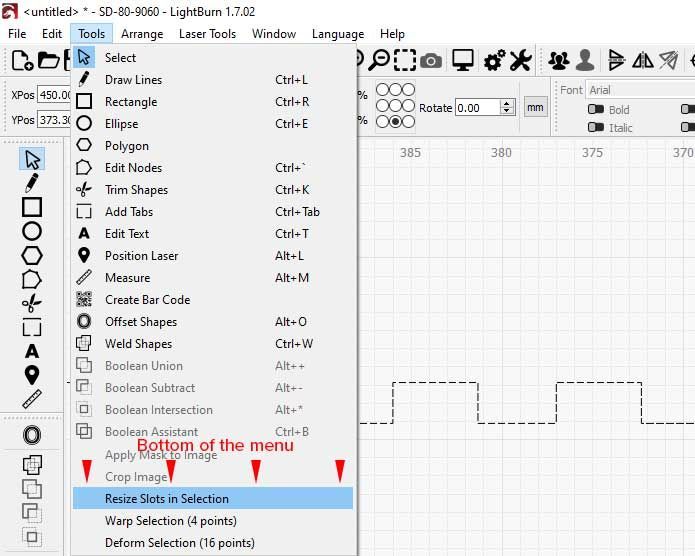
- Navigate to the "Tools" dropdown menu and select "Resize Slots in Selection" to open the resize dialog window.
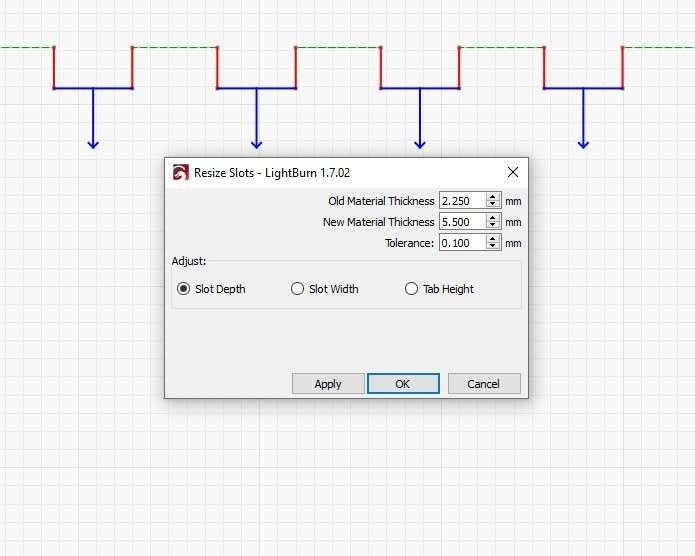
- Input the line size you're adjusting from the original material thickness—in this case, from 2.25mm to 5.5mm for thicker material.
Fine-Tuning Adjustments
If the lines vary slightly in length, add a tolerance value to accommodate these differences. You can adjust slot depth, slot width, or tab height. Toggling these options updates the guides, allowing you to see precisely what will be resized. Lines detected are highlighted in red, and the adjustments are marked in blue with arrows indicating the direction of the move.
Applying the Changes
Once satisfied with the settings, click "OK" to apply the resized values and update the design. Recheck the dimensions using the measurement tool to ensure everything is set correctly, making your design ready for the laser.
Common Issues and Tips
Sometimes, you may encounter issues like incompatible shapes or grouped elements. Designs with text, open shapes, or added fillets might not work with the resize tool. You can refine these elements using LightBurn's radius tool to remove fillets and the offset tool set to zero to clear any unwanted details.
The Slot and Tab Resizer Tool from LightBurn, supported by Rabbit Laser USA machines, introduces a level of precision that turns a complex process into a few simple clicks. It saves time, reduces errors, and lets you focus more on creativity and less on configuration.
Got a project you’ve enhanced with this tool? We’d love to see it! Share your creations with us or get in touch if you need tips on making the most of your Rabbit Laser USA machine. Let's cut, create, and conquer together! 🐰