Mastering LightBurn's Alignment Tools for Laser Design

When using LightBurn software for your laser engraving projects, knowing how to effectively utilize the alignment tools can significantly streamline your design process. These tools are essential for precisely positioning graphics in your workspace, ensuring your artwork or job layouts are perfectly aligned every time.


Align Tools: Your Path to Precision


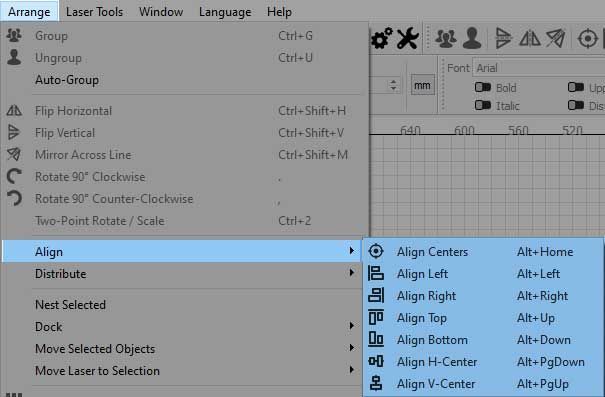
LightBurn’s Align options are at the core of its design efficiency. These tools enable you to align selected objects along their top, bottom, left, or right edges, as well as their vertical or horizontal centers. This functionality is crucial for both individual object adjustments and aligning multiple objects relative to one another.


You’ll find these tools under the Arrange Toolbar. To simplify access, you can enable the 'Arrange Long' setting under the Window menu to display all alignment options directly on the toolbar. For a cleaner interface, you can choose to hide duplicate options by tweaking your settings in the same menu.

LightBurn Align Toolbar
LightBurn Align Long

Effective Use of Align Tools


To get the most out of the Align tools, begin by selecting the objects you want to align. If you aim to align all objects to a particular one, hold shift and click on that object last. This action sets it as the reference point for alignment. For instance, when you use the Align Centers tool after this, all selected objects will center around this last selected item, both vertically and horizontally.


If a final object isn’t specified, LightBurn defaults to aligning to the first object in its internal draw order. To make the alignment process more intuitive, manually selecting your reference object last can simplify your workflow.


Locked Shapes and Group Alignments


LightBurn allows you to lock objects, which can influence how they are aligned. A locked object automatically becomes the reference in any alignment operation, regardless of the order in which other objects are selected. If several objects are locked, they are ignored for alignment purposes, and the alignment is carried out based on the order of the remaining, unlocked objects.


When dealing with grouped shapes, the Align tools treat them as a single unit, maintaining their relative positions within the group. Their edges and centers are defined by the smallest rectangle that can contain the entire group. To align shapes within a group independently, you’ll need to ungroup them first.


Understanding Bounding Boxes


Each shape is defined by a bounding box, which is the smallest rectangle capable of containing the shape. This bounding box is used for alignment purposes and may not correspond to the visual or geometric center of the shape. Recognizing this helps you better predict and manage the outcomes of your alignments.


Hotkeys and Beginner Mode


LightBurn includes hotkeys for most of its Align options, providing a quick way to access these tools without navigating through menus. For newcomers, the software offers a beginner mode that simplifies the interface and includes an alignment helper that shows previews before applying settings, making it easier to achieve the desired result

Screenshot of Alignment Hotkeys in the Arrange drop down menu

Practice Makes Perfect


The key to mastering these alignment tools is regular use and experimentation. Incorporate them into your projects to see how they can enhance your workflow and improve the precision of your designs. As you grow more accustomed to these functionalities, you’ll find that arranging and aligning objects becomes a swift and integral part of your design process.


Ready to take your projects to the next level? Consider enhancing your creative potential with a high-quality laser machine from Rabbit Laser USA. Explore our range of machines today and discover the perfect tool to bring your ideas to life. Visit us at Rabbit Laser USA to learn more and start your journey towards precision crafting. Happy designing with Rabbit Laser USA! 🐰

3D printed attachments and laser-cut components developed by Rabbit Laser USA
By Rod Boehm April 14, 2025
Learn how Rabbit Laser USA combines 3D printing and laser cutting to improve precision, boost efficiency, and innovate custom fabrication solutions.
blog post thumbnail
By Rod Boehm April 2, 2025
Discover the art of crafting beautiful wood inlays with precision laser cutting in our step-by-step guide. Learn essential tips for preparing and testing materials like Baltic birch plywood and cherry wood veneer, ensuring flawless results in your projects. This tutorial covers everything from selecting the right wood and masking techniques to detailed engraving and cutting processes. Perfect for DIY enthusiasts and crafters looking to enhance their skills with laser technology!
By Rod Boehm March 21, 2025
Learn how to master job origins in LightBurn with this essential guide. Discover when to use Absolute Coordinates, User Origin, and Current Position to improve precision, efficiency, and material usage in your laser cutting and engraving projects. Plus, get quick tips to streamline your workflow and avoid common mistakes.
photo of RuiDa control pad and controller
By Rod Boehm March 5, 2025
Discover why RuiDa controllers are the industry standard for laser engraving and laser cutting machines. Learn how they outperform proprietary controllers, offer seamless LightBurn compatibility, and provide unmatched precision. At Rabbit Laser USA, we’ve been upgrading customers' machines with RuiDa to give them full control over their laser cutter and engraver. Upgrade your laser machine today!
laser cut cardinal with blog text
By Rod Boehm February 28, 2025
Create a vibrant, layered cardinal with this beginner-friendly laser cutting guide. Learn color separation, painting tips, and assembly tricks for eye-catching décor.
Rabbit Laser USA's DL-90-1390 co2 laser machine in a classroom setting
By Rod Boehm February 14, 2025
Empower your classroom with Rabbit Laser USA’s reliable laser systems—minimize downtime, save with educator discounts, and spark student creativity!
Blog thumbnail choosing the right lens
By Rod Boehm February 5, 2025
Discover the importance of selecting the right focal length for your CO2 laser machine with Rabbit Laser USA. Learn about different lenses, their optimal uses, and maintenance tips to enhance your laser engraving and cutting projects. Ensure precision and safety with our guide to lens choices and care.
By Rod Boehm January 29, 2025
Learn why maintaining your laser’s exhaust system is crucial for safety, health, and top performance. Get monthly maintenance tips, discover which materials are toxic, and see how Rabbit Laser USA’s 550W Vacuum Blower Fan can keep your workspace safe and efficient.
Learn how to design and create a 57mm cube using MakerCase and Rabbit Laser USA's SD-60-9060 CO2 las
By Rod Boehm January 22, 2025
Learn how to design and create a 57mm cube using MakerCase and Rabbit Laser USA's SD-60-9060 CO2 laser cutter. Follow our step-by-step guide featuring precision settings, cutting tips, and assembly techniques for a perfect fit. Perfect for makers, hobbyists, and educational projects!
title text over a body of water
By Rod Boehm January 15, 2025
Minimize downtime with Rabbit Laser USA's in-stock laser machine parts and fast shipping. From lenses to air assist components, we ensure reliable quality and quick delivery. Count on our lifetime customer support to keep your laser engraving and cutting machines running smoothly. Visit us today to stay productive!
By Rod Boehm January 8, 2025
Learn how to master air assist for laser engraving and cutting projects. Discover when to use air assist, tips for optimizing performance, real-world applications, and troubleshooting common issues. Achieve cleaner cuts, sharper engravings, and safer results with expert guidance from Rabbit Laser USA.
laser tube in front of title text
By Rod Boehm December 31, 2024
Learn how to maximize the lifespan of your CO2 laser tube with expert tips on maintenance, cooling systems, optimal settings, and more. Keep your machine running smoothly and efficiently for years.
More Posts