Blog Layout

Transform Your Projects: Must-Know Material Testing in LightBurn!

Introduction


Setting up a material test in LightBurn software is essential for achieving optimal laser cutting and engraving results. By conducting these tests, users can determine the best settings for different materials, ensuring precision and efficiency.


Why Material Tests are Crucial


Material tests help identify the correct parameters for your laser machine. Each material reacts differently to the laser, and without testing, you might end up with poor quality cuts or engravings. Testing helps in:


  • Determining optimal power and speed: Different materials require different power and speed settings.
  • Preventing damage: Incorrect settings can damage your material or the laser itself.
  • Enhancing quality: Proper settings ensure clean cuts and precise engravings.


Steps to Set Up a Material Test in LightBurn


Step 1: Open LightBurn Software


Begin by launching LightBurn on your computer. Ensure your laser machine is connected and properly configured.


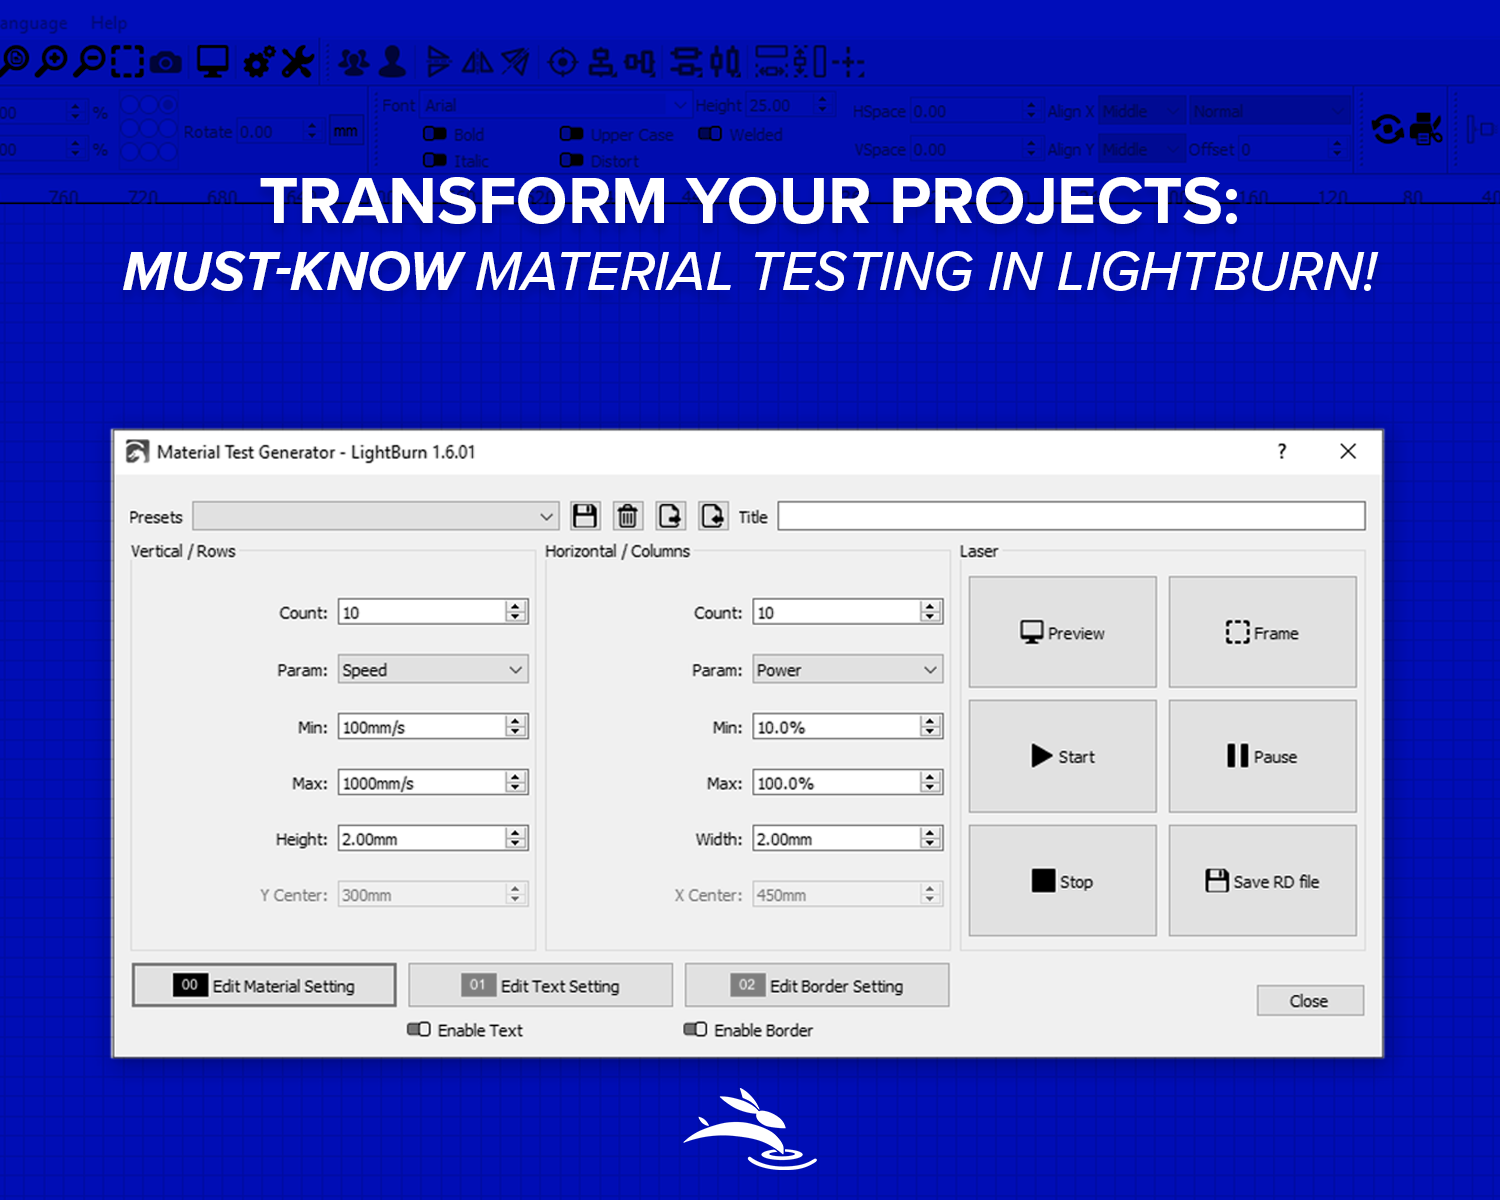
Step 2: Access the Material Test Generator


Navigate to the 'Tools' menu and select 'Material Test Generator.' This tool simplifies the process of creating test patterns.


Step 3: Configure Test Parameters


In the Material Test Generator, configure the parameters for your test. This includes:

  • Power settings: Specify the range of power levels you want to test.
  • Speed settings: Set the range of speed levels to be tested.
  • Interval settings: Choose the intervals between different power and speed settings.


Step 4: Generate the Test Pattern

Once you've configured the parameters, generate the test pattern. The Material Test Generator will create a grid with different combinations of power and speed settings.


Step 5: Place Your Material


Place your material on the laser bed. Ensure it is securely fastened to prevent movement during the test.


Step 6: Run the Test


Execute the test pattern on your material. The laser will run through all the combinations of power and speed settings.


Step 7: Analyze the Results


After the test completes, analyze the results to determine the optimal settings for your material.

  • Check for precision: Look for clean cuts and sharp engravings.
  • Avoid burns and damages: Ensure the material is not burnt or damaged.
  • Fine-tune settings: Make any necessary adjustments to further optimize the settings.


Tips for Effective Material Testing


Use a Variety of Materials


Test on different materials you plan to use. Each material will have unique requirements.


Document Your Findings


Keep a log of the settings that work best for each material. This will save time in future projects.


Regular Testing


Conduct regular tests, especially when working with new materials or after maintenance of the laser machine.


Conclusion


Running material tests in LightBurn is a vital step in laser cutting and engraving. It ensures that you achieve the best possible results with each project. By following these steps and tips, you can optimize your workflow and maintain high-quality outputs. 🐰

photo of a key in a door lock with title name overlay
by Rod Boehm 27 Jun, 2024
Discover the best free vector resources for laser cutting with Rabbit Laser USA! Explore top sites like Vecteezy, OpenClipart, and more to enhance your laser projects. Unleash your creativity with high-quality, commercial-free vectors perfect for any design. No sponsorships, just great resources!
by Rod Boehm 25 Jun, 2024
Unlock the secrets of flawless laser engraving with our comprehensive guide on the power of jigs. Discover expert tips on choosing the right materials, setting up your laser engraver, and advanced techniques to enhance your engraving projects. Learn how to optimize precision, efficiency, and safety in your work. Perfect for both beginners and experienced engravers. Elevate your craft with our detailed exploration of jigs in laser engraving today!
open view of a rabbit laser usa machine with title text
by Rod Boehm 20 Jun, 2024
Discover the precision and efficiency of CNC laser cutting in this comprehensive guide. Learn how CNC laser cutting works, its advantages, applications across various industries, and the different types of laser cutters. Explore the materials suitable for laser cutting, the cutting process, and how it compares to traditional methods. Stay updated with the latest innovations, cost considerations, safety measures, and environmental impacts. Find tips on choosing the right CNC laser cutter and get insights into future trends. Perfect for manufacturers, engineers, and anyone interested in advanced cutting technology.
by Rod Boehm 11 Jun, 2024
What is a Fiber Laser Marking Machine? If you’re diving into the world of laser marking and engraving, you’ve probably come across the term " fiber laser marking machine ." But what exactly is it? Let’s break it down in simple terms and give you a comprehensive look at its features, advantages, and drawbacks. Plus, we'll share some personal insights to help you make an informed decision. Understanding Fiber Laser Marking Machines A fiber laser marking machine is a type of laser that uses a fiber optic cable to deliver high-intensity laser beams to mark or engrave materials. Fiber lasers are known for their efficiency, precision, and versatility. They are particularly effective for marking metals, plastics, and other industrial materials. How Does It Work? The core of the fiber laser marking machine is its fiber optic laser source. This source generates a beam that is then directed through a high-speed scanner to create precise, high-quality marks on a variety of surfaces. The process is non-contact, meaning it doesn’t physically touch the material, which ensures minimal wear and tear. Pros of Fiber Laser Marking Machines Precision and Quality : Fiber lasers produce incredibly precise and clean marks, making them ideal for detailed designs and intricate patterns. Speed : They are faster than many other types of laser marking machines, which can significantly boost productivity. Durability : These machines are built to last, with many models requiring minimal maintenance. Versatility : Fiber lasers can mark a wide range of materials, including metals, plastics, ceramics, and even some organic materials. Efficiency : They have a high electrical efficiency, often converting more than 70% of the input power into laser light. Environmental Benefits : They are generally more environmentally friendly due to their high efficiency and lower power consumption. Cons of Fiber Laser Marking Machines Initial Cost : They can be more expensive upfront compared to other types of laser marking machines. Complexity : The technology can be complex, requiring some learning and adjustment for new users. Limited Material Suitability : While versatile, fiber lasers are not always the best choice for materials like wood or glass, where CO2 lasers might perform better. Personal Experience with Fiber Laser Marking Machines At Rabbit Laser USA, we’ve been using fiber laser marking machines for a variety of applications. From marking serial numbers on industrial parts to creating intricate designs on promotional items, these machines have proven to be reliable and efficient. The precision is particularly impressive; we’ve been able to achieve detailed engravings that are simply not possible with other methods. One of the challenges we faced initially was getting the hang of the software and settings. However, once we got through the learning curve, the process became smooth and intuitive. Maintenance has been minimal, mostly just routine cleaning and occasional calibration. Recommendations for Potential Buyers Assess Your Needs : Consider what materials you’ll be working with and the level of detail required in your projects. This will help you determine if a fiber laser is the right choice. Budget Considerations : While the initial cost can be high, think of it as an investment. The efficiency and durability of fiber lasers often result in lower long-term costs. Training and Support : Make sure to choose a supplier that offers good training and ongoing support. This can make a big difference, especially if you’re new to the technology. Visit Rabbit Laser USA : For more detailed information or to purchase a fiber laser marking machine, we encourage you to visit our website . We offer a range of models and our team is always ready to help you find the perfect match for your needs. Conclusion Fiber laser marking machines are powerful tools that can take your marking and engraving projects to the next level. While they come with a higher initial cost and a bit of a learning curve, their precision, speed, and versatility make them a worthwhile investment. If you’re considering adding a fiber laser to your toolkit, don’t hesitate to reach out to us at Rabbit Laser USA. We’re here to help you make the best choice for your business or personal projects. Feel free to contact us or visit Rabbit Laser USA for more information and to explore our range of fiber laser marking machines. We’re always here to assist you in making the right decision! 🐰
Title text over honey comb and gantry of co2 laser machine
by Rod Boehm 07 Jun, 2024
"Explore the power of CO2 laser engraving and cutting machines at Rabbit Laser USA. Discover precision, speed, and versatility for your projects. Expert advice, high-quality machines, and exceptional customer service await. Visit us now!"
by Rod Boehm 04 Jun, 2024
Learn essential safety steps before operating your laser machine. This comprehensive guide covers grounding, temperature control, beam alignment, and more to ensure smooth and secure laser cutting and engraving. Safety first for laser success!
by Rod Boehm 30 May, 2024
Learn how to efficiently create duplicates of your designs using the array tool with Rabbit Laser USA. Our step-by-step guide shows you how to prepare your artwork, set up duplicates horizontally and vertically, and optimize material usage. Perfect for keychain production and more. Maximize your laser cutting efficiency today!
headline text in front of a library bookshelf
by Rod Boehm 28 May, 2024
Learn how to efficiently store and manage your artwork with LightBurn’s Art Library. This comprehensive guide covers enabling the Art Library, creating and organizing libraries, importing graphics, and transferring files between computers to streamline your creative projects.
by Rod Boehm 23 May, 2024
Discover how to master LightBurn's coordinate system with our comprehensive guide. Learn the differences between absolute coordinates, user origin, and current position, and find out how to use each "Start From" option effectively for precise laser cutting and engraving. Enhance your projects with expert tips and best practices for consistent, accurate results.
by Rod Boehm 20 May, 2024
Learn how to master LightBurn's Print and Cut tool for precise laser cutting and engraving. This comprehensive guide covers setting up your material, aligning your laser with registration marks, and ensuring perfect cuts on pre-existing designs. Ideal for gantry-based lasers using absolute coordinates, this tutorial will help you expand the capabilities of your laser projects. Perfect for anyone looking to improve their laser cutting accuracy and efficiency with LightBurn.
close up of laser head with blog title,
by Rod Boehm 16 May, 2024
Ensure optimal performance of your CO2 laser engraving cutting machine with our step-by-step guide on replacing or cleaning your lens. Follow these instructions for efficient maintenance and troubleshooting.
a price tag with the blog title
by Rod Boehm 13 May, 2024
Unlocking Profit Potential: Discover the secrets to pricing laser-cut engraved products strategically in this comprehensive guide. Maximize profits, understand market dynamics, and build customer trust with transparent pricing strategies. Dive in now!
More posts
Share by: